This section gives further guidance on what each button/icon function on the menu bar performs in the Claims Portal.
Open Activity:
The Open Activity icon is available against claims that you can work on. When clicking on the icon, the claim will be locked to you.

View Process Details:
When clicking on the ‘View Process Details’ icon, the details of the CNF and Compensator/Insurer response will be displayed. The claim will not be locked.

View Process History:
When clicking on the ‘View Process History’ icon, you can see the history of the activities that the claim has gone through, and who has been working on the claim. The information at the top of the screen also shows you who has locked the claim (if locked), and who can work on it.

Search:
In the Search window, you can search for specific claims which are either in progress or until archived. Select ‘Search’ from the toolbar. Please note the following:
-
If you know the claim number, enter it in the Application ID without leading zeros.
-
You can also by search using the surname of the Claimant.
-
If you are unable to locate a claim, try taking out the to and from dates and search again. The claim may have been created before the date it was submitted.
Get User Profile:
To display details about your Login, click on your User ID and select ‘View all Details’.

Change Password:
To change your password, click on your User ID, select 'View all details', then select 'Change password'
![]()
Log in as another User:
Team Leaders are given the option to log in as another user. This enables Team Leaders to go into another User’s Worklist to unlock claims should they need to do so.
Click on ‘View all Details’ and select ‘Change User’. Remember to log out of the Portal when you have completed the task.
![]()
Exit (Log out of the Portal):
It is important that when you have finished working with the Portal you log out. Select ‘View all Details’ from the toolbar, then select 'Restore User'

Unlocking a claim:
The icons below will appear at the right-hand side of a claim to show whether the claim is locked or not. If the claim is locked by another user, you can view the Process History to see who it is locked to.
If the claim is locked to you, you can click on the ‘Unlock’ link to unlock it.
If the claim is locked by another user within your organisation, a user with a Team Leader profile can use the ‘Login as another user’ function available via the Tools option on the menu bar.
For assistance in logging in as another user, please see guidance 2 points previous on this guide.


![]()


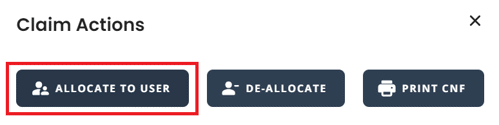
Allocate to User:
This button enables a Team Leader to allocate the claim to a specific handler.
The claim is then only visible in the Worklist of this handler. It is still possible for other users to locate the claim via the Search function.
Notifications relating to the claim are sent to all users in order to avoid claims being “forgotten” due to sudden leave, sickness etc. of the allocated User.
When clicking the Allocate to User button, the Team Leader must:
- Select the profile of the User to whom they want to allocate the claim (from a drop-down list), which will display a list of users with that profile;
- Select the User to whom the claim should be allocated;
- Confirm
The selected User is allocated a claim.
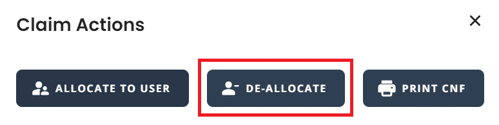
De-allocate:
By clicking the De-allocate button, you can de-allocate a claim that was allocated to you, which makes it visible in the Worklist of all the users of your organisation.
Note that a user with Team Leader profile can use the ‘Login as another user’ function to log on as the user the claim is allocated to and then ‘De-allocate’ the claim.
Exit process:
If you need to take the claim out of the process, you can use the Exit process button.
When clicking the Exit process button, you must:
- Select the appropriate reason code (selected from a drop-down list);
- Add a comment;
- Confirm
The claim is then sent to the Compensator who must acknowledge the Exit process. Once acknowledged, the claim will end in the Portal.
It is important to note that this function only allows you to record the reason why you are taking the claim out of the process. It does not replace Protocol requirements to give Compensators written notice of your intention to remove the claim from the process.

The system guides you while filling in the forms by displaying and hiding the required/not required fields. You need to complete the fields on the current tab before pressing Continue.
In some cases, validation is performed when the ‘Continue’ button is pressed, and you will not be able to proceed until you have corrected the error.
When you click the ‘Continue’ button, a new tab is available for data input, while other tabs are accessible in read-only mode.

Back:
When you click the Back button, the previous tab will be displayed, available for edit, while all other tabs are shown in read-only mode.
Please don’t use the web browser back button to move between the claims processing screen/tabs as this may result in undesired outcomes.

Send:
The Send button allows you to send the current details to the Compensator. It is usually available on the last screen that you have to complete when performing functions such as creating a Stage 2 Settlement pack or responding to a Counter Offer.
You should check the details carefully before you use the Send button, as the step cannot be reversed.
The claim will disappear from your Worklist and appear in the Compensator’s. To view a claim, you should use the ‘Search’ function.

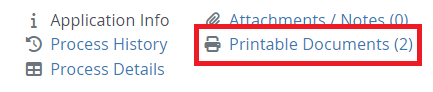
Printable documents:
You can download the latest copy of all PDFs generated so far by clicking the ‘Printable Documents’ icon
Attachments/Notes:
This feature enables you to add additional information and supporting documents to the claim. The icon is located at the top right-hand corner of the webpage.
